Nanny Shecando

Supporting the international nanny industry

  • About
  • Blog
    • All Blog Posts
    • The Read Aloud Series
    • Nanny Life
    • ‘How To’ Series
    • DIY + Crafts
    • Nanny Careers Guide
    • Nanny Resources
    • Lifestyle
  • Work With Me
  • Press
    • Press Mentions
    • Nanny Industry Spotlight
  • Nanny Spotlight
  • CONTACT
    • FAQ
    • Disclosure + Policy
  • New Reader? Start Here…
You are here: Home / Archives for How To

A DIY Velcro No Sew Banner Craft

A DIY Velcro No Sew Banner from Dunne with Style

We received this cute heart-shaped VELCRO ® NO SEW BANNER craft, project designed by Dunne with Style, to feature and review on the blog.

Given we love all things craft and DIY, we jumped at the opportunity to review this product. And when there’s Velcro © involved, well we thought it’d be an easy win for little fingers. The idea of Sticky Back Velcro © was even more appealing as it could allow us to involve the smaller children to have more independence when it came to controlling all aspects of their crafts.

DIY-Velcro-No-Sew-Banner-Craft-2

As they say, “when you’re teaching the adults of tomorrow, you need a little flexibility.”

Our resident craft blogger Olivia from A Crafty Living assembled the craft following the manufacturer’s supplied tutorial and reviewed the product. We’ve re-designed some of the steps to make the process more child friendly. Below the tutorial you’ll find our thoughts on just how child-friendly this craft could be.

 >>> How To Make This Velcro No Sew Banner

A DIY No Sew Velcro Banner with Dunne with Style and A Crafty Living for NANNY SHECANDO

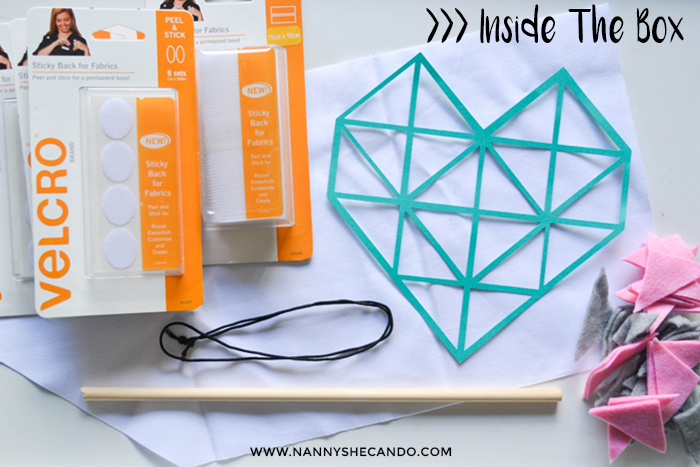
1 // Cut a 20cm of VELCRO ® Sticky Back for Fabrics. Adhere one side of the VELCRO ® Sticky Back for Fabrics along the top of the back of your banner and adhere the second side of the VELCRO ® Sticky Back for Fabrics below leaving a 5cm space between the strips.

A DIY No Sew Velcro Banner with Dunne with Style and A Crafty Living for NANNY SHECANDO

2 // Lay your piece of dowel between the two strips. Fold your banner over the dowel and adhere the pieces of VELCRO ® Sticky Back for Fabrics together.

A DIY No Sew Velcro Banner with Dunne with Style and A Crafty Living for NANNY SHECANDO

3 // Wrap the cord around one end of the dowel 5 times and then adhere with a knot. Wrap the other end of the cord around the other end of the dowel 5 times and then tie off with a knot.

A DIY No Sew Velcro Banner with Dunne with Style and A Crafty Living for NANNY SHECANDO

4 // Lay the geometric heart template on your banner.

A DIY No Sew Velcro Banner with Dunne with Style and A Crafty Living for NANNY SHECANDO

5 // Fill each space in the template with one side of a VELCRO ® Sticky Back for Fabrics dot.

A DIY No Sew Velcro Banner with Dunne with Style and A Crafty Living for NANNY SHECANDO

6 // Place the second side of each VELCRO ® Sticky Back for Fabric dot on a felt triangle piece.

A DIY No Sew Velcro Banner with Dunne with Style and A Crafty Living for NANNY SHECANDO

7 // Adhere the felt triangles in your chosen colour pattern by adhering the pieces of the VELCRO ® Sticky Back for Fabrics. Your kit contains more felt triangles than spaces on the template so that you can get creative with your own colour patterns.

A DIY No Sew Velcro Banner with Dunne with Style and A Crafty Living for NANNY SHECANDO

8 // Gently lift off your geometric heart template and enjoy your wall hanging. Need a fresh look, simply peel back your felt triangles and rearrange your colour pattern. And there you have it, a DIY No Sew Velcro Banner!

A DIY No Sew Velcro Banner with Dunne with Style and A Crafty Living for NANNY SHECANDO

We were sent this VELCRO ® No Sew Banner Kit to try. The kit contained everything we needed to create a geometric heart banner. It came packaged in a box, with the items loose to move around, causing our heart to get damaged during transit. This was easily fixed, however padding within the box would prevent this from happening again.

When you’re teaching the adults of tomorrow, you need a little flexibility #craftylivingkids #velcro

Click To Tweet

The process was simple with easy to follow instructions, however would better suit adults rather than children. Miss5 gave it her best, persevering through frustration by the fiddly, hands on task. Miss5 chose her own colour pattern & enjoyed the challenge, despite needing help with many of the steps.

*Project design by Dunne with Style. NANNY SHECANDO was gifted this velcro no sew banner craft to review on the blog

 >>> Do you use Velcro © within your craft activities to make DIY more child-friendly & accessible?

__________

A Crafty Living | Olivia FosterOlivia is a career Nanny & craft extraordinaire from Sydney, Australia. She shares her passion for children & creativity by providing simple arts, crafts & activities full of learning opportunities. Her aim is to encourage & inspire you to be creative with your babies, toddlers and preschoolers! You can find more from Olivia at www.acraftyliving.com or follow her on Facebook & Instagram at @acraftyliving.

May 21, 2016 By Olivia Foster Filed Under: DIY, How To

Salt Dough Necklaces for Mother’s Day

Make these kid-friendly salt dough necklaces for mother's day by NANNY SHECANDO and A Crafty Living

Make these kid friendly salt dough necklaces for the perfect mother's day gift by A Crafty Living for nannyshecando.com

Give Mum a one-of-a-kind Mother’s Day gift with these simple kid-made Salt Dough Necklaces. We’ve teamed up with Olivia over at A Crafty Living to bring you this fun Mother’s Day gift idea. To make use of your extra salt dough, check out Olivia’s salt dough fridge magnets.

With Mother’s Day approaching we got crafty in the kitchen to make some Salt Dough Necklaces. This is a hands on craft activity with an added sensory element that also happens to be practically free! #win.

Mr3 helped to measure out the ingredients and enjoyed mixing them together. Miss17 months even got involved and helped with the mixing (& tasting) too!

We also made a few extras, as Mr3 was determined on making a necklace for his Dad & younger sister as well. Here’s how we made these Salt Dough Necklaces for Mother’s Day, plus a free recipe printable.

>>> How to make Salt Dough Necklaces for Mother’s Day

Make these kid-friendly salt dough necklaces for mother's day by NANNY SHECANDO and A Crafty Living

Age: 3 years +
Time: 30 mins + drying time

You’ll Need:

Flour
Salt
Water
Straw
Cookie Cutters
Paint
Twine

To Make:

1 // Make your Salt Dough Pendants with whichever shapes you like. Don’t forget to use a straw to make the necklace hole.

2 // Bake your Salt Dough or allow to air dry.

3 // Once completely dried out, your pendants are ready to paint.

4 // Once the paint is dry, seal your pendants with a clear spray sealer, clear dry glue or Mod Podge.

5 // Thread your Salt Dough Pendants onto twine and tie up into a necklace. We also added some beads too. Now all that’s left is to wrap and gift to Mum on Mothers Day!

Make these kid-friendly salt dough necklaces for mother's day by NANNY SHECANDO and A Crafty Living

Tips & Tricks

> We added extra flour whilst kneading to stop it from sticking to the board. I found adding more to the original mix made the dough too dry. But adding it throughout the kneading process made it just right!

> Remember to place the dough on baking paper to avoid sticking.

> If the oven is too hot they will rise and cook.

> Keep the oven as low as possible to dry them out. You can place another tray & a heavy weight on top to keep them from rising.

> The thicker the dough, the longer they need to dry.

> Flip them half way to thoroughly dry out.

More of A Crafty Living on NANNY SHECANDO

Give Mum a fun #MothersDay gift with kid-made Salt Dough Necklaces @acraftyliving #kidscrafts

Click To Tweet

Click to download your FREE Salt Dough recipe printable

Salt Dough Necklaces for Mother's Day by A Crafty Living and NANNY SHECANDO. Download the free recipe card printable on www.nannyshecando.com

The batch is quite big & will make lots of Salt Dough Necklaces. If you’re looking for another activity to use up the rest of the dough, we’ve shared how to make these Mother’s Day Salt Dough Fridge Magnets on A Crafty Living.com.

P.S. You can check out the Mother’s Day Flower Photo frames we did last year too. Wishing all the mothers a very Happy Mother’s Day, and Happy Crafting!

>>Have you ever made salt dough necklaces before? If not, now’s the time!


__________

A Crafty Living | Olivia FosterOlivia is a career nanny & craft extraordinaire from Sydney, Australia. She shares her passion for children & creativity by providing simple arts, crafts & activities full of learning opportunities. Her aim is to encourage & inspire you to be creative with your babies, toddlers and preschoolers! You can find more from Olivia at www.acraftyliving.com or follow her on Facebook | Instagram | Pinterest.

May 1, 2016 By Olivia Foster Filed Under: DIY, How To

Recycled Egg Carton Mini Easter Egg Baskets

How To Make Recycled Egg Carton Mini Easter Egg Baskets with A Crafty Living and Olivia Foster for NANNY SHECANDO

Easter has come early this year! To celebrate our EGG-citement, for a long weekend, family festivities & of course, CHOCOLATE, we made these Mini Easter Egg Baskets! A hands-on, messy craft using just a few supplies from your craft box.

These Mini Easter Egg Baskets are a great way to limit your child’s daily chocolate intake following a weekend of (no doubt) many Easter egg hunts. From my experience, it can be hard for our little chocolate lovers to understand they can’t eat all their collected goodies at once.

We’ve found this to be a fun way for kids to learn about ‘sometimes’ foods, and how often we can eat them. Fill your mini baskets with a few little eggs, or 1 big egg to have each day (or however often you choose)!

Ready for a fun Easter weekend project? Here’s how to make Recycled Egg Carton Mini Easter Egg Baskets with your toddlers and preschoolers.

>>> How To Make Recycled Egg Carton Mini Easter Egg Baskets

How To Make Recycled Egg Carton Mini Easter Egg Baskets with A Crafty Living and Olivia Foster for NANNY SHECANDO

Age: 2+ years
Time: 15 mins

You’ll Need:

Egg Carton
Tissue Paper Confetti
Pipe Cleaners
PVA Glue
Scissors
Paintbrush

To Make:

1 // Cut your egg carton into individual sections. This is a job for an adult; it can be super tricky cutting egg cartons!

2 // Make a small hole at either end of each egg carton section. This is where you will later attach the pipe cleaners for your handle!

3 // Cover the inside of each egg section with PVA glue.

4 // Take a handful of confetti and press it into the glue. You may need to tip it upside down to remove any excess confetti.

5 // Take half a pipe cleaner, and press each end into the ready-made holes, folding up to hold in place.

6 // Once dry, take your chocolate (or selected goodie substitute) & place it into your Mini Easter Baskets!

Mini Easter Egg Baskets with A Crafty Living for NANNY SHECANDOMini Easter Egg BasketsMini Easter Egg BasketsMini Easter Egg BasketsMini Easter Egg BasketsMini Easter Egg Baskets with A Crafty Living for NANNY SHECANDO

Here’s how to make Recycled Egg Carton Mini #easteregg Baskets with your toddlers and preschoolers. – @acraftyliving #craftylivingkids

Click To Tweet

More of A Crafty Living for NANNY SHECANDO

You could also paint or decorate the outside of the egg carton too!

Hoppy Easter & Happy Crafting!

>>> How are you celebrating Easter this year?

p.s. I hear lots of water is the cure to chocolate hangovers – you’re welcome!

__________

A Crafty Living | Olivia FosterOlivia is a career Nanny & craft extraordinaire from Sydney, Australia. She shares her passion for children & creativity by providing simple arts, crafts & activities full of learning opportunities. Her aim is to encourage & inspire you to be creative with your babies, toddlers and preschoolers!
You can find more from Olivia at www.acraftyliving.com or follow her onFacebook & Instagram at @acraftyliving.

March 22, 2016 By Olivia Foster Filed Under: DIY, How To

St Patrick’s Day Fizzing Shamrocks Craft

St Patricks Day Fizzing Shamrocks Craft, Olivia Foster, A Crafty Living, easy kids crafts

We got in the spirit of St Patrick’s Day this week – Fizzing Shamrocks craft anyone? – with this awesome science-meets-art project.

Have you ever tried the baking soda & vinegar experiment? This was the first time Mr3 had experienced it. To say he loved it would be an understatement!

I didn’t tell him about the epic reaction that was about to occur, instead I asked him to predict what might happen when he added the vinegar. His response? A colour change.

Upon adding the vinegar, Mr3 looked up at me with the biggest eyes & an even bigger smile. This arty-experiment sure is a must try. Here’s how to make your own St Patrick’s Day Fizzing Shamrocks Craft.

>>> Make These St Patrick’s Day Fizzing Shamrocks Craft

St Patricks Day Fizzing Shamrocks Craft, A Crafty Living, Olivia Foster, easy kids crafts

Age: 3+ years
Time: 15 mins + drying time

You’ll Need:

Cardstock Shamrock cutouts
Baking Soda
Green Food Colouring
Vinegar
Pipettes
Ruler

To Make:

1 // We tried 2 different ways to colour our Shamrock’s: both leaving a unique pattern! (Remember the food dye will stain clothes & fingers)

You can:

  • Make a dry mix of baking soda & food colouring – this created the darker Shamrocks. Or,
  • Colour the vinegar with food colouring – this created the lighter Shamrocks.

2 // Pour your baking soda over the cardstock – you can spread it out or leave it in piles.

3 // Using a pipette, squirt vinegar over the baking soda and watch & listen to the reaction.

4 // Allow to dry completely then take a ruler and scrape off the excess baking soda.

That’s your Shamrocks all finished! This experiment would also work great for a St Patrick’s Day Fizzing Rainbow. Give it a try and show us the results.

St Patricks Day Fizzing Shamrocks Craft_5


More Crafts: St Patrick’s Day Rainbow Pot Of Gold

St Patrick’s Day Fizzing Shamrocks Craft – an awesome science-meets-art project! @acraftyliving #craftylivingkids

Click To Tweet

I hadn’t done the vinegar/soda experiment before, so this one was so fun to make! Tag your pics with #craftylivingkids & #nannyshecando. Happy Crafting & Happy St Patrick’s Day!

>> We’d love to hear what *your* kids thought would happen upon adding the vinegar!

__________

A Crafty Living | Olivia FosterOlivia is a career Nanny & craft extraordinaire from Sydney, Australia. She shares her passion for children & creativity by providing simple arts, crafts & activities full of learning opportunities. Her aim is to encourage & inspire you to be creative with your babies, toddlers and preschoolers!
You can find more from Olivia at www.acraftyliving.com or follow her on Facebook & Instagram at @acraftyliving.

March 14, 2016 By Olivia Foster Filed Under: DIY, How To

Make These Valentines Day Heart Prints

Valentines Day Heart Prints, Olivia Foster, A Crafty LIVing, Valentines Day, easy kids craft, love heart prints

Love is in the air, and these Valentines Day Heart Prints are perfect! We’re back with a quick and easy printmaking craft for kids, just in time for Valentines Day. It’s not too late to add a simple personal touch to your Valentines Day gifts! 

Make your own cards and wrapping paper. Or print onto butcher’s paper and wrap it around a bouquet of flowers! You could even use fabric paint to print hearts onto a pillowcase or t-shirt.

With just a few supplies and 2 easy steps, here is how to make your own Valentines Day heart prints!

>>> Make These Valentines Day Heart Prints

Valentines Day Heart Prints, Olivia Foster, A Crafty LIVing, Valentines Day, easy kids craft, love heart prints

Ages: 4+
Time: 15mins

You’ll Need:

Cardboard
Low temp Glue Gun
Washable Kids Paint
Paintbrush
Cardstock or Butchers Paper

To Make:

1 // Use your glue gun to draw hearts and patterns onto small pieces of cardboard (and words if you’re feeling extra clever! Remember they’ll be reversed)! If you don’t have a low temp glue gun, have your child draw their pattern & shapes on the cardboard, then you can copy over it with a regular hot glue gun. Try to keep the thickness of the glue as even as possible.

2 // Once the glue is dry, paint over the top & press the print firmly onto your paper & repeat!

We finished our hearts off by painting the insides with watercolours, then folding the cardstock in half & created a simple card. You could also write inside the hearts or colour them in with pencils.

Valentines Day Heart Prints, Olivia Foster, A Crafty LIVing, Valentines Day, easy kids craft, love heart printsValentines Day Heart Prints, Olivia Foster, A Crafty LIVing, Valentines Day, easy kids craft, love heart printsValentines Day Heart Prints, Olivia Foster, A Crafty LIVing, Valentines Day, easy kids craft, love heart printsValentines Day Heart Prints, Olivia Foster, A Crafty LIVing, Valentines Day, easy kids craft, love heart printsValentines Day Heart Prints, Olivia Foster, A Crafty LIVing, Valentines Day, easy kids craft, love heart printsvalentines day heart prints, Valentines Day Heart Prints_2, Olivia Foster, A Crafty LIVing, Valentines Day, easy kids craft, love heart prints

Make these heart printed cards for #valentinesday and or print onto paper to wrap #flowers @oliviasfoster #craftylivingkids

Click To Tweet

For more Valentines Day crafts and tutorials for kids, make these Valentine Day Washi Tape Sticker Notes.

Don’t forget to share the love & show us your Valentines Day crafts by using the #craftylivingkids and #nannyshecando hashtags! Happy Crafting and Happy Valentines Day, Olivia. xx

_________

Olivia is a career nanny of 5 years and craft extraordinaire. Having travelled Australia working with many families, Olivia now resides in Sydney and cares for 7 children aged 15 months to 1o years old. Craft + diy activities feature prominently in their daily schedule. You can follow Olivia on instagram  {@oliviasfoster} for crafty ideas and activities, and on her newly launched website A Crafty LIVing.com.

February 14, 2016 By Olivia Foster Filed Under: DIY, How To

  • 1
  • 2
  • 3
  • …
  • 7
  • Next Page »

Oh, Hi There!

I'm Hope & I help nannies transform their approach to job search, and inspire those working with kids to maximise their potential within the international nanny industry. Plus, did I mention I like crafts + diy, baking & playing! Read More

  • Facebook
  • Instagram
  • LinkedIn
  • Pinterest
  • Twitter

Featured Posts

A DIY Velcro No Sew Banner from Dunne with Style

A DIY Velcro No Sew Banner Craft

If you’re new here, you may want to subscribe to my RSS feed. Thanks for visiting! We received this cute heart-shaped VELCRO ® NO SEW BANNER craft, project designed by Dunne with Style, to feature and review on the blog. Given we love all things craft and DIY, we jumped at the opportunity to review […]

Make these kid-friendly salt dough necklaces for mother's day by NANNY SHECANDO and A Crafty Living

Salt Dough Necklaces for Mother’s Day

Give Mum a one-of-a-kind Mother’s Day gift with these simple kid-made Salt Dough Necklaces. We’ve teamed up with Olivia over at A Crafty Living to bring you this fun Mother’s Day gift idea. To make use of your extra salt dough, check out Olivia’s salt dough fridge magnets. With Mother’s Day approaching we got crafty […]

How To Make Recycled Egg Carton Mini Easter Egg Baskets with A Crafty Living and Olivia Foster for NANNY SHECANDO

Recycled Egg Carton Mini Easter Egg Baskets

Easter has come early this year! To celebrate our EGG-citement, for a long weekend, family festivities & of course, CHOCOLATE, we made these Mini Easter Egg Baskets! A hands-on, messy craft using just a few supplies from your craft box. These Mini Easter Egg Baskets are a great way to limit your child’s daily chocolate […]

St Patricks Day Fizzing Shamrocks Craft, A Crafty Living, easy kids crafts

St Patrick’s Day Fizzing Shamrocks Craft

We got in the spirit of St Patrick’s Day this week – Fizzing Shamrocks craft anyone? – with this awesome science-meets-art project. Have you ever tried the baking soda & vinegar experiment? This was the first time Mr3 had experienced it. To say he loved it would be an understatement! I didn’t tell him about the […]

Post Categories

Subscribe to Blog via Email

Enter your email address to subscribe to this blog and receive notifications of new posts by email.

Join 132 other subscribers

Recent Posts

  • A DIY Velcro No Sew Banner Craft
  • Salt Dough Necklaces for Mother’s Day
  • Recycled Egg Carton Mini Easter Egg Baskets
  • St Patrick’s Day Fizzing Shamrocks Craft
  • Make These Valentines Day Heart Prints
  • Valentines Day Washi Tape Wall Sticker Love Notes
  • Make This Preschooler DIY Cutting Station
  • Toddler Friendly Easy Kids Christmas Craft
  • The Rabbit Who Wants to Fall Asleep Book Review
  • How To Make A Paper Pocket Watch
  • ‘Nanny Life’ Series
  • DIY + Crafts
  • Lifestyle
  • Careers Guide
  • ‘How To’ Series

Copyright © 2023 · NANNY SHECANDO by HOPE FOR NANNIES